Key Takeaway
Zepbound injection guide with step-by-step instructions for using the autoinjector pen, choosing injection sites, managing needle anxiety, and proper storage and disposal.
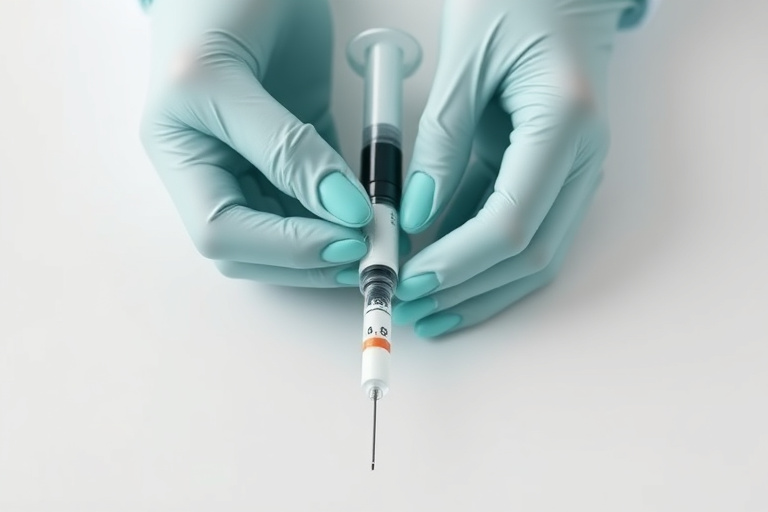
Giving yourself a Zepbound injection is simpler than most patients expect. The prefilled autoinjector pen does most of the work: you position it against your skin, press a button, and hold for 10 seconds. There's no measuring, no drawing up medication, and no visible needle. This guide walks you through every step in detail, from unboxing your first pen to proper disposal after injection, so you feel confident from your very first dose.
How the Zepbound Pen
Each Zepbound pen is a single-use, disposable autoinjector. It contains one pre-measured dose and is discarded after use. The pens are color-coded by dose strength so you can easily identify the correct one. Check out our Zepbound weight loss timeline for detailed data.
View data table
| Category | Mean Body Weight Loss (%) | Detail |
|---|---|---|
| Tirzepatide | 22 | ~22% body weight at 72 wks |
| Semaglutide | 15 | ~15% body weight at 68 wks |
| Liraglutide | 8 | ~8% body weight at 56 wks |
| Retatrutide | 24 | ~24% in Phase 2 trial |
Pen Components
- Base cap (gray): Covers the needle end. Removed before injection.
- Clear base: The flat end you press against your skin. Contains the hidden needle.
- Lock ring: A safety feature that prevents accidental activation. You twist it to access before use.
- Injection button (purple): Press and hold to deliver the dose.
- Viewing window: Shows the gray plunger. When the plunger fills the window after injection, the dose is complete.
Needle Specifications
The pen uses a 31-gauge, 5 mm needle. For reference, standard blood draw needles are 21 to 23 gauge (much thicker). The Zepbound needle is thinner than a human hair and so short that it only penetrates the subcutaneous fat layer, not muscle. Most patients describe the sensation as a brief, mild pressure rather than a sharp poke.
Before You Inject: Preparation Steps
- Remove the pen from the refrigerator 30 minutes before injection. Injecting cold medication can sting. Letting it reach room temperature reduces discomfort. Don't use a microwave, hot water, or any heat source to warm it.
- Check the medication. Look through the viewing window. The liquid should be clear and colorless to slightly yellow. Don't use the pen if the liquid is cloudy, discolored, or contains visible particles.
- Check the expiration date. Printed on the pen label. Don't use an expired pen.
- Wash your hands. Soap and water for at least 20 seconds.
- Gather supplies. Alcohol swab (optional but recommended), your sharps container for disposal, and a bandage if desired.
Choosing Your Injection Site
Zepbound can be injected into three body areas:
Check your GLP-1 eligibility
Use our free BMI Calculator to see if you may qualify for provider-reviewed GLP-1 therapy.
Try the BMI Calculator →Abdomen
The most popular site. Choose an area at least 2 inches away from the belly button, avoiding the belt line. The lower abdomen (between the navel and hip bone) typically has the most subcutaneous fat, making injections easier and more comfortable. Avoid areas with stretch marks, scars, or bruises.
Front of the Thigh
The mid-to-upper portion of the front thigh is the second most common site. This area is easy to access and see. It's a good alternative for patients who find abdominal injections uncomfortable or who have limited abdominal fat.
Back of the Upper Arm
This site is viable but harder to reach on your own. It works best if someone else is administering the injection for you. The outer-back portion of the upper arm has adequate subcutaneous fat for proper absorption.
All three sites provide equivalent drug absorption. Choose based on comfort and convenience.
Step-by-Step Injection Instructions
Step 1[1]: Remove the Base Cap
Pull the gray base cap straight off. Don't twist. You'll see the clear base with the hidden needle inside. Don't touch the clear base or try to look for the needle.
Step 2: access the Pen
Turn the lock ring from the locked position to the achieved position. You'll feel and hear a click. The purple injection button is now active.
Step 3: Position the Pen
Clean the injection site with an alcohol swab and let it air dry. Place the clear, flat base firmly against your skin at a 90-degree angle. The pen should be perpendicular to your body, not at an angle.
Step 4: Press and Hold the Button
Press the purple injection button firmly. You'll hear a loud click, which means the injection has started. Keep the pen pressed against your skin. You may feel a slight poke as the needle enters (many patients feel nothing at all). The injection takes approximately 5 to 10 seconds.
Step 5: Wait for the Second Click
Hold the pen in place until you hear a second click and see the gray plunger completely fill the viewing window. This confirms the full dose has been delivered. Continue holding for a full 10 seconds after pressing the button to be safe.
Step 6: Remove and Dispose
Lift the pen straight away from your skin. The needle retracts automatically. Don't recap the pen. Place it immediately in your sharps disposal container.
A small drop of blood or a tiny bruise at the injection site is normal and not a cause for concern. Apply gentle pressure with a cotton ball if needed. Don't rub the site.
After the Injection
- You can resume normal activities immediately. There are no restrictions on bathing, exercising, or other daily activities.
- Make a note of the injection date and site in a journal or app so you can track your rotation schedule.
- Mild soreness or redness at the site may last 1 to 2 days. This is normal.
- If you experience itching at the site, a cool compress or over-the-counter hydrocortisone cream can help.
Site Rotation Strategy
Rotate your injection site each week to prevent skin irritation, lipodystrophy (lumps under the skin from repeated injections in the same spot), and inconsistent absorption.
A Simple Rotation Plan
- Week 1: Right side of abdomen
- Week 2: Left side of abdomen
- Week 3: Right thigh
- Week 4: Left thigh
- Repeat the cycle
Within each general area, vary the exact spot by at least 1 inch from the previous injection. Some patients use a clock method: imagine the injection area as a clock face and move to a different "hour" each week.
Storage Requirements
| Condition | Requirement |
|---|---|
| Unopened pens (primary storage) | Refrigerator: 36 to 46 degrees F (2 to 8 degrees C) |
| Room temperature storage | Up to 86 degrees F (30 degrees C) for a maximum of 30 days |
| Freezing | Don't freeze. Discard any pen that has been frozen. |
| Light exposure | Store in original carton to protect from light. |
| Travel | Use an insulated bag with a cold pack (not touching the pen directly) for transport. |
Proper Disposal
Used Zepbound pens must be disposed of in an FDA-cleared sharps container. You can purchase one at any pharmacy for $5 to $15. Once the container is three-quarters full, seal it and follow your local regulations for sharps disposal. Many pharmacies, hospitals, and community centers accept used sharps containers.
If you don't have a sharps container immediately available, place the used pen in a puncture-resistant container such as a heavy-duty laundry detergent bottle with a screw cap. This is a temporary solution. Don't throw used pens in regular household trash or recycling.
Managing Needle Anxiety
Needle anxiety is real and common. An estimated 20 to 25% of adults have some degree of needle phobia. Here are strategies that help our patients:
- Understand the needle is hidden. You never see it before, during, or after injection. The pen design specifically addresses needle phobia.
- Ice the site. Hold an ice cube against the injection area for 20 to 30 seconds before injecting. This numbs the skin and reduces sensation.
- Distract yourself. Watch a video on your phone, listen to music, or have someone talk to you during the injection. The entire process takes under 15 seconds.
- Use the thigh for your first injection. Many patients find this site less psychologically intimidating than the abdomen.
- Remember that most patients say it's painless. On a 1-to-10 pain scale, the vast majority rate Zepbound injections at 0 to 2. The anticipation is almost always worse than the actual experience.
- Ask for help. A partner, family member, or friend can administer the injection for you while you look away.
Troubleshooting Common Issues
The pen did not click when I pressed the button
Make sure you achieved the lock ring. The button won't activate if the pen is still locked. Also ensure you're pressing the pen firmly against your skin. The pen requires skin contact to trigger.
I am not sure the full dose was delivered
Check the viewing window. If the gray plunger is fully visible and fills the window, the dose was delivered. If the plunger isn't fully advanced, the dose may be incomplete. Don't attempt to re-inject with the same pen. Contact your provider for guidance.
There's a drop of liquid on my skin after injection
A small drop of medication on the skin surface is common and doesn't mean you missed your dose. The amount lost is negligible. Don't re-inject.
I see blood at the injection site
A small amount of blood is normal. You may have nicked a tiny blood vessel. Apply gentle pressure with a cotton ball. A small bruise may develop. This doesn't affect the medication's effectiveness.
The injection hurt more than usual
Occasionally, you may hit a more sensitive spot or a small nerve ending. Try a slightly different location next time. Ensuring the medication is at room temperature and the site is clean and dry also helps minimize discomfort.
My pen feels warm or was left out overnight
If the pen was at room temperature (below 86 degrees F / 30 degrees C) for less than 30 days total, it's still safe to use. Check the 30-day clock from when you first removed it from the refrigerator. If it was in a hot car, direct sunlight, or above 86 degrees F, discard it. Temperature-damaged medication may have reduced potency or altered chemistry.
I accidentally injected an air bubble
Small air bubbles in a subcutaneous injection are harmless. The air is absorbed by surrounding tissue without any clinical effect. This is different from intravenous injections, where air bubbles can be dangerous. Don't worry about small bubbles with the Zepbound pen.
Injection Confidence: What to Expect Week by Week
If you're new to self-injections, it helps to know that the process gets dramatically easier with each repetition.
Injection 1 (Week 1)
This is the hardest one. Anxiety about needles, correct technique, and potential pain is at its peak. Take your time. Review the steps. Remember that the needle is hidden and the injection takes less than 15 seconds. Most patients rate the actual pain level at 1 to 2 out of 10, much less than they expected.
Injections 2-3 (Weeks 2-3)
Confidence builds quickly. You have done it before and know what to expect. The mechanical steps (remove cap, position pen, access, press) become more fluid. Most patients spend less than 2 minutes on the entire process by week 3.
Injections 4-8 (Weeks 4-8)
By now, the injection is routine. You barely think about it. The process from removing the pen from the fridge to disposing of it takes about 5 minutes total (including the 30-minute warm-up time). Many patients describe it as less inconvenient than remembering to take a daily pill.
Long-Term (Month 3+)
The injection is a non-event. Patients who were terrified of needles at week 1 consistently report that the injection is the easiest part of their Zepbound routine. The bigger daily tasks are hitting protein targets and drinking enough water.
Special Situations
Injecting With Arthritis or Limited Hand Mobility
The Zepbound pen requires moderate grip strength to remove the base cap and press the injection button. If you have arthritis or limited hand mobility, try these approaches:
- Use a rubber grip pad to help remove the base cap
- Press the injection button with the palm of your hand rather than your thumb
- Ask a caregiver or family member to administer the injection (the upper arm is ideal for someone else to inject)
- Contact Eli Lilly for information about accessibility aids
Injecting If You Are on Blood Thinners
Patients taking blood thinners (warfarin, apixaban, rivaroxaban, or daily aspirin) can safely use Zepbound. But you may experience more bruising at injection sites. Apply gentle pressure with a cotton ball for 30 to 60 seconds after the injection. Avoid rubbing the site. Rotate sites consistently to give any bruised areas time to heal.
Injecting During Illness
If you're experiencing vomiting, diarrhea, or dehydration from an unrelated illness, consult your provider before taking your next Zepbound dose. The additional GI stress from the medication may worsen dehydration. In most cases, you can resume injections once you're keeping fluids down normally.
Building Injection Confidence: Week by Week
For patients new to self-injection, the learning curve is real but short. Here is what most patients experience as they develop competence and confidence.
Week 1: Nervous But Manageable
Your first injection takes the longest. Many patients spend 10 to 15 minutes preparing mentally, reading the instructions again, and working up the nerve to press the button. This is completely normal. The actual injection takes about 10 seconds, and the vast majority of patients say "that was it?" afterward. The anticipation is almost always worse than the reality.
Week 2: Getting the Hang of It
The second injection is markedly easier. You know what to expect: the click, the brief pressure, and the minimal or absent discomfort. The process takes about 3 to 5 minutes including preparation. Anxiety is reduced by at least half for most patients.
Week 3-4: Becoming Routine
By the third or fourth injection, most patients describe the process as "no big deal." Preparation is automatic. Many patients can complete the entire process in under 2 minutes. Injection day stops being an event and becomes just another part of the weekly routine, like taking out the trash or doing laundry.
Month 2+: Autopilot
After 8+ injections, the process is fully routine. Most patients inject quickly and move on without giving it a second thought. Some even forget which injection day it's and need a phone reminder. This level of comfort is the norm, not the exception.
Common Injection Mistakes and How to Avoid Them
Even experienced patients sometimes make mistakes. Here are the most common ones and how to prevent them.
Not Holding Long Enough
After pressing the injection button, you must hold the pen against your skin until the second click sounds and the gray plunger is visible in the viewing window. This takes about 10 seconds. Removing the pen early means you may not receive your full dose. If you think you removed the pen too soon, don't inject again. Contact your provider to discuss next steps.
Injecting Into a Bruised or Scarred Area
Bruised, scarred, or inflamed skin doesn't absorb medication as consistently as healthy tissue. Always choose a clean, smooth area with adequate subcutaneous fat. If you have limited injection sites due to scarring or other skin conditions, discuss site options with your provider.
Forgetting to Check the Medication
Before every injection, look through the viewing window. The medication should be clear and colorless. If it's cloudy, discolored, or contains visible particles, don't use that pen. Contact your pharmacy for a replacement. Also check the expiration date, especially if you have pens stored for future use.
Using Cold Medication
Injecting cold medication straight from the refrigerator can increase discomfort and slow absorption. Remove the pen from the refrigerator 30 minutes before injection to allow it to reach room temperature. Don't microwave, heat, or place in hot water. Simply leave it on the counter.
Same Site Every Week
Repeatedly injecting in the same spot can cause lipodystrophy (lumpy or uneven fat tissue under the skin), which affects medication absorption. Use the rotation system described earlier in this guide: divide each injection area into quadrants and rotate systematically. Zepbound dosage guide
Frequently Asked Questions
Can I reuse a Zepbound pen?
No. Each pen is single-use and contains exactly one dose. The pen locks after use and can't be reactivated. Attempting to reuse or extract additional medication is unsafe.
What if I inject into muscle instead of fat?
The 5 mm needle length makes intramuscular injection unlikely in most patients. Even if it occurs, the medication will still be absorbed. You may experience slightly more soreness at the injection site. If you're very lean and concerned about this, use the thigh or abdomen where subcutaneous fat is thicker.
Can I inject through clothing?
No. Always inject into clean, bare skin. Remove any clothing covering the injection area.
Does it matter what time of day I inject?
No. Choose a consistent time that works for your schedule. Many patients prefer evening injections to sleep through initial side effects. Others prefer morning to start their weekly cycle fresh. Zepbound dosage guide
Can I travel with Zepbound on an airplane?
Yes. Prescription injectable medications are permitted through TSA security. Carry your pens in their original packaging with the pharmacy label visible. Use an insulated travel case to maintain temperature. Notify TSA agents that you're carrying injectable medication. Don't place pens in checked luggage, as cargo holds may freeze.
What should I do if I drop the pen?
If the pen falls from a reasonable height onto a hard surface, it's likely fine as long as the viewing window shows clear, colorless liquid and no cracks are visible. If the pen appears damaged, cracked, or the liquid looks abnormal, don't use it. Contact your pharmacy for a replacement.
How do I dispose of sharps if I travel frequently?
Portable travel-size sharps containers are available at most pharmacies. When traveling by car, keep the container in a cooler bag separate from food. When flying, you can carry used sharps in a small, sealed, hard-sided container in your carry-on luggage.
Medical References
- Wilding JPH, Batterham RL, Calanna S, et al. Once-Weekly Semaglutide in Adults with Overweight or Obesity. N Engl J Med. 2021;384(11):989-1002. [PubMed | ClinicalTrials.gov | DOI]
- Davies M, Færch L, Jeppesen OK, et al. Semaglutide 2.4 mg once a week in adults with overweight or obesity, and type 2 diabetes (STEP 2). Lancet. 2021;397(10278):971-984. [PubMed | ClinicalTrials.gov | DOI]
- Wadden TA, Bailey TS, Billings LK, et al. Effect of Subcutaneous Semaglutide vs Placebo as an Adjunct to Intensive Behavioral Therapy on Body Weight in Adults With Overweight or Obesity (STEP 3). JAMA. 2021;325(14):1403-1413. [PubMed | ClinicalTrials.gov | DOI]
- Rubino D, Abrahamsson N, Davies M, et al. Effect of Continued Weekly Subcutaneous Semaglutide vs Placebo on Weight Loss Maintenance in Adults With Overweight or Obesity (STEP 4). JAMA. 2021;325(14):1414-1425. [PubMed | ClinicalTrials.gov | DOI]
- Garvey WT, Batterham RL, Bhatt DL, et al. Two-year effects of semaglutide in adults with overweight or obesity (STEP 5). Nat Med. 2022;28(10):2083-2091. [PubMed | ClinicalTrials.gov | DOI]
Get Personalized Injection Support
At FormBlends, we walk every new patient through their first injection during a virtual or phone consultation. If you're nervous about starting, know that you won't be figuring this out alone. Our providers are available to answer questions and provide guidance at every step. Schedule your consultation to get started.
See your options in about 2 minutes
Take the free quiz and see what fits you. Quick, private, and no commitment to continue.
See my options →